There are a lot of videos out right now about persistent memory for Claude plus a tool like Obsidian. With the pace of innovation from Claude right now, I haven’t had the time or energy to keep up with all of it.
Then I found a video that broke it down simply enough for me to invest a small bit of time into learning the concept. And after following along for about an hour, I had something working — a personal Wikipedia for a topic I care about, built and maintained by Claude, running entirely on my laptop.
This article is for those of you who want your first taste of this. The interplay between a coding agent, local files, and a tool like Obsidian can be very powerful — it expands what you can do with AI beyond a web-only chat interface into a persistent, local database of controlled documents. If that sounds interesting but intimidating, this is a good starting point.
The idea comes from Andrej Karpathy, co-founder of OpenAI and former AI director at Tesla. He calls it the LLM Wiki. The video I followed is from Jamie Keet’s channel Teacher’s Tech, and I found it to be excellent — clear, beginner-friendly, and practical. I’ll likely be diving deeper into his channel. Everything below is the written version of what he demonstrates, because sometimes you want instructions you can reference at your own pace rather than pausing and rewinding a video.
Credit where it’s due: Jamie’s full video is here, and Karpathy’s original idea file is on GitHub.
The Problem It Solves
When you upload documents to ChatGPT, NotebookLM, or similar tools and ask a question, the AI searches through your files, grabs relevant chunks, and gives you an answer. That works. But ask a similar question tomorrow and the AI does all of that work again from scratch. Nothing was saved. Nothing was built up. Every question starts from zero.
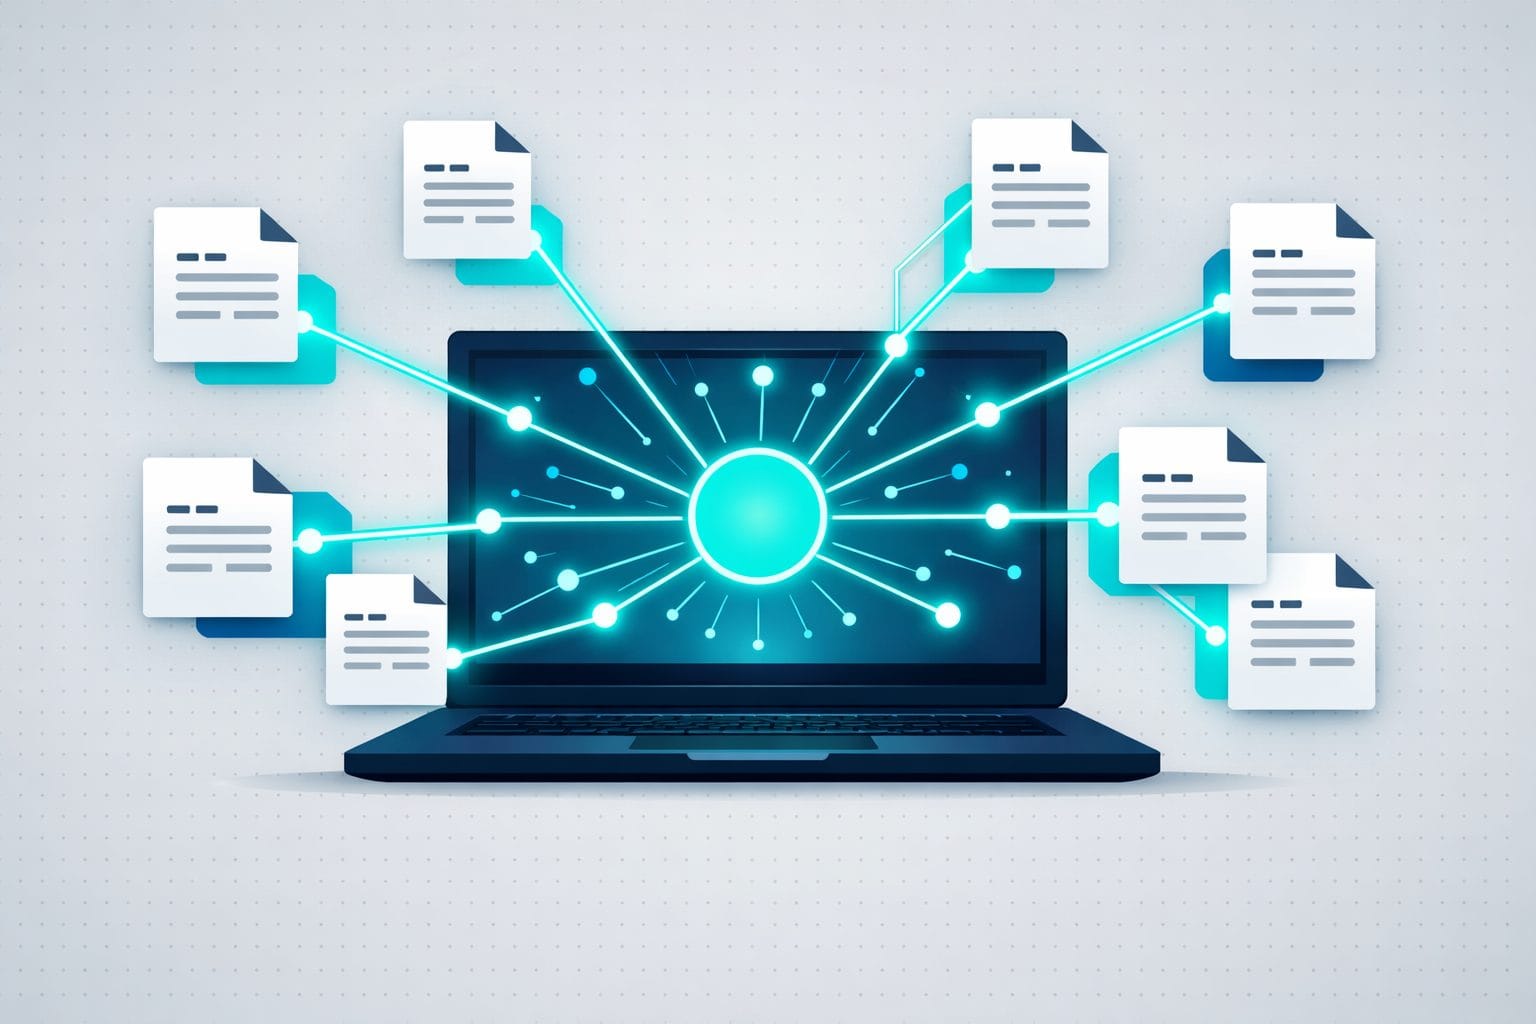
The LLM Wiki flips that. Instead of re-reading your raw files every time, the AI reads them once and builds a structured, interlinked wiki. New sources get integrated into what already exists. Connections get made automatically. Knowledge compounds over time instead of evaporating between sessions.
Karpathy’s way of describing it: Obsidian is the IDE, the LLM is the programmer, and the wiki is the codebase. You rarely write the wiki yourself. The AI handles the writing, linking, and organizing. You decide what goes in and what questions to ask.
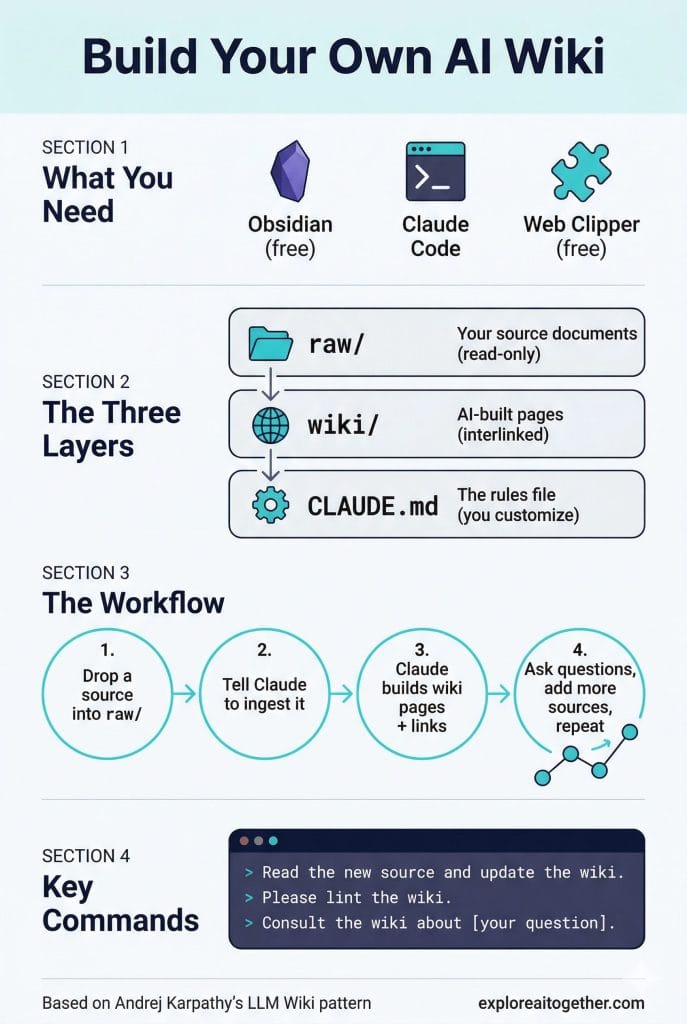
What You Need
Obsidian — A free note-taking app that works with plain markdown files. Download it at obsidian.md. You’re using it as a viewer with one killer feature: a graph view that shows how all your wiki pages connect to each other.
Claude Code — An AI coding agent that reads and writes files on your computer. This is the engine. You could also use OpenAI Codex, Cursor, or similar tools, but Claude Code is what Jamie demonstrates and what I’m using.
The Obsidian Web Clipper — A free browser extension that converts any web page into a markdown file with one click. This is a hidden gem I want to call out specifically. Available for Chrome, Firefox, Safari, and Edge at obsidian.md/clipper. It’s the fastest way to get web sources into your wiki.
The Three Layers
Layer 1: Raw Sources — A folder called raw/ where you drop your original documents. PDFs, articles, notes. The AI reads these but never changes them. Your source of truth.
Layer 2: The Wiki — A folder called wiki/ where the AI creates and maintains all of its pages. Index, concepts, entities, summaries — all interlinked, all maintained by Claude.
Layer 3: The Schema — A rules document called CLAUDE.md that tells the AI how to structure everything. This is the one file you customize.
Setting It Up
Step 1: Create Your Vault
Open Obsidian, click “Create new vault,” name it, and save it somewhere you’ll remember. A vault is just Obsidian’s word for a folder.
Step 2: Create Three Folders
Inside your vault, create: raw (AI reads from here, never changes anything), wiki (AI builds and maintains pages here), and templates (optional, for manual note formats).
Step 3: Create the CLAUDE.md Schema File
This is the most important piece. Create a file called CLAUDE.md in the root of your vault — not inside any folder. Claude Code reads this automatically when it opens a project.
Jamie provides a starter template you can download at go.teachers.tech/LLM_Wiki_CLAUDE. The schema tells Claude five things: the wiki’s purpose, the folder structure, how to process new sources, page formatting rules, and how to answer questions. The purpose line is the only thing you need to customize — change it to whatever topic you’re building a wiki about.
Here’s what the key sections cover:
Purpose — One line describing what this wiki is about. Jamie’s demo uses “planning a trip to Japan.” Mine is about YouTube content ideas and lessons learned. Change this to your topic.
Folder structure — Tells Claude where raw sources live (raw/) and where wiki pages go (wiki/). Don’t touch this.
Source processing — When you add a new document, Claude should read it, create wiki pages for key concepts, update the index, and log what changed.
Page formatting — Every page gets a summary at the top. Every claim references its source. Pages link to related concepts using [[wikilinks]].
Question answering — When you ask Claude a question, it should consult the wiki first, cite specific pages, and tell you when something is uncertain.
Step 4: Install the Web Clipper
Add the Obsidian Web Clipper extension to your browser. Find an article worth adding, click the extension, and it saves a clean markdown file. Drag it into your raw/ folder. PDFs work too — Claude Code reads them natively.
Step 5: Point Claude Code at Your Vault
Open your terminal, navigate to your vault’s directory, and launch Claude Code. The CLAUDE.md file tells it the rules automatically.
Step 6: Ingest Your First Source
Tell Claude: “I just added a new source to the raw folder. Please read it and update the wiki.”
Claude reads the document, identifies key concepts, creates structured wiki pages, builds an index, and links everything together. Switch to Obsidian’s graph view and you can see the connections forming — even from a single document.
Step 7: Keep Adding Sources
When you add a second source, Claude doesn’t just create new pages. It updates existing ones with new information, makes connections between concepts spread across different documents, and the graph grows. The wiki gets genuinely smarter with every source.
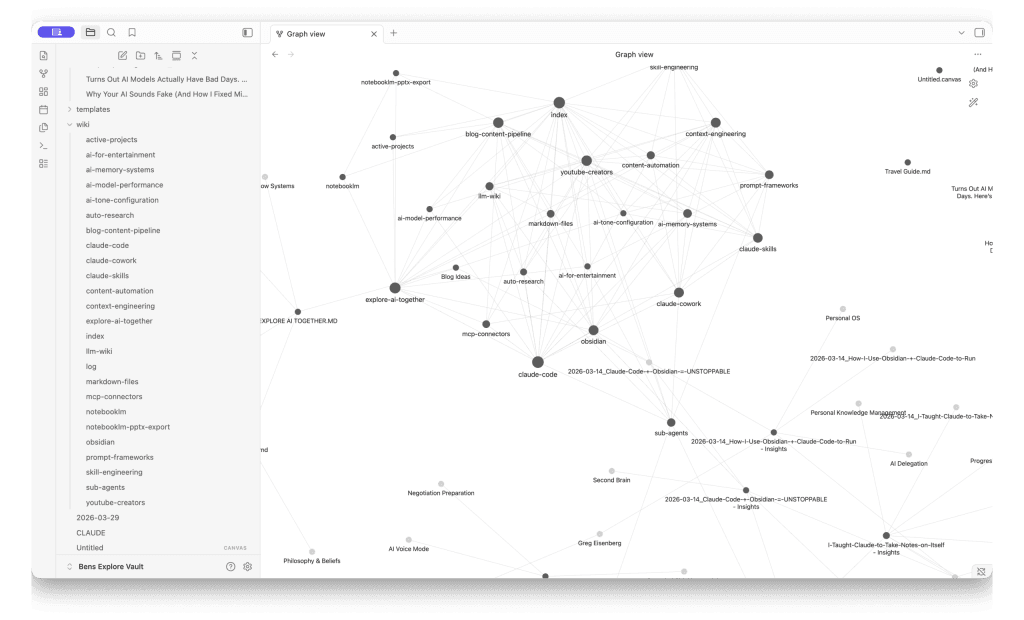
and content strategy. Each node is a page Claude created and linked automatically.
Asking Questions Across Sources
Once you have a few sources ingested, try asking a question that requires information from multiple documents. Claude pulls from the wiki pages it already built — not the raw files. It connects ideas that were spread across completely different sources, and cites the specific wiki pages it used. The synthesis is already done.
Linting Your Wiki
One of the cleverest parts: you can periodically ask Claude to audit the whole wiki. Just say “Please lint the wiki.” Claude checks for contradictions between pages, orphan pages with no links, and concepts mentioned but missing their own page. It gives you a report and offers to fix what it finds.
What I’m Using It For
I set up my own LLM Wiki to organize YouTube content ideas and lessons learned — everything I’m picking up from AI creators, tools I’m testing, and content strategies. I’m using Claude Code to build it out, and after just a handful of sources, the graph view started showing connections I hadn’t consciously made. It’s also made me think that a wiki format might actually be a better way to organize a lot of my work in general (a realization that is both exciting and slightly exhausting).
Honest Limitations
It works best at personal scale. Karpathy talks about wikis around 100 articles. Tens of thousands of pages need more infrastructure.
Garbage in, garbage out. You still need to curate what goes in.
You need a coding agent. Obsidian alone doesn’t do this — Claude Code is the engine.
The AI can make mistakes. It might miscategorize something or make a wrong connection. That’s what linting is for.
With those caveats, this is one of the most practical AI workflows I’ve come across. Everything stays on your computer in plain text files you own. No vendor lock-in, no proprietary database.
Quick Reference
What you need:
- Obsidian (free) — obsidian.md
- Claude Code (or similar AI coding agent)
- Obsidian Web Clipper (free) — obsidian.md/clipper
- Jamie’s CLAUDE.md template — go.teachers.tech/LLM_Wiki_CLAUDE
- Karpathy’s idea file — GitHub Gist
Folder structure:
Your Vault/
├── raw/          ← Drop sources here (AI reads, never changes)
├── wiki/         ← AI builds and maintains pages here
├── templates/    ← Optional
└── CLAUDE.md     ← Schema/rules file (customize the purpose line)
Key commands:
- “I just added a new source to the raw folder. Please read it and update the wiki.”
- “Please lint the wiki.”
- “[Any question] — consult the wiki.”
Full video walkthrough: Teacher’s Tech — Karpathy’s LLM Wiki Full Beginner Setup Guide
For background articles check-out my other related articles: Make Claude Code Remember, 10 Claude Code Tips
What I’ve Learned After Weeks of Actually Using This
Since publishing this article, I’ve been running two separate wiki projects — one for my blog research and content strategy, and a second for a side project exploring a digital product idea. The setup tutorial above gets you started, but here’s what I wish I’d known from the beginning.
Your CLAUDE.md Will Evolve — And That’s the Point
The starter template from Jamie’s video is a great foundation, but don’t treat it as finished. My CLAUDE.md files have gone through several revisions as I discovered what works and what doesn’t. The schema is a living document — think of it as a codebase you refactor as you learn.
Some things I’ve added to mine over time: source type tables (so Claude knows how to handle YouTube transcripts differently from web clippings), enriched transcript bundle specs (for when you’re processing video content with metadata), and archive workflows for managing processed source files. Each addition came from hitting a real friction point and solving it.
If you’re running multiple wiki projects, compare your CLAUDE.md files periodically. Lessons from one project often improve the other.
Concept Pages Beat Source Pages Every Time
This was my biggest early mistake. When I ingested my first few sources, Claude created one wiki page per source — basically a summary of each document. That’s fine for three sources, but by source number ten you have a mess of overlapping pages with no synthesis.
The fix: explicitly tell Claude in your CLAUDE.md to create concept pages that synthesize across multiple sources, not one page per source. For example, instead of separate pages for three YouTube videos about pricing strategies, Claude creates a single “pricing-strategies” page that pulls the best insights from all three and notes where they disagree. This is where the wiki starts to feel like something more than a folder of notes.
Add a line like this to your Rules section: “Prefer updating existing concept pages over creating new ones when a topic is already covered.” It prevents wiki sprawl as your source count grows.
Archive Your Raw Files
The original template says raw files are immutable — never modify them. That’s good advice, but I’d go further: create a raw/archive/ subfolder and move source files there after Claude ingests them. This way, when you tell Claude to check for new sources, it only sees unprocessed files. No confusion about what’s been ingested and what hasn’t.
Your folder structure becomes:
Your Vault/
├── raw/              ← Drop new sources here
│   └── archive/      ← Processed sources get moved here
├── wiki/             ← AI builds pages here
├── outputs/          ← Generated artifacts (blog drafts, reports)
└── CLAUDE.md         ← Schema file
The outputs/ folder is another addition I’d recommend. When you ask Claude to generate something from the wiki — a blog draft, a comparison report, a gap analysis — it goes in outputs/ with a date prefix like 2026-05-06_market-analysis.md. Keeps generated artifacts separate from the wiki’s knowledge pages.
Citations Matter More Than You Think
The starter template uses (source: filename.pdf) for citations. That works at first, but filenames are messy — they have dates, weird characters, version numbers. Once you archive or rename a file, the citation breaks conceptually even if nothing technical fails.
Switch to human-readable citations early. I use formats like:
(source: Channel Name — Video Title)for YouTube content(source: Author — Article Title (domain.com))for web articles(source: Reddit — r/subreddit thread)for forum content
This makes wiki pages readable on their own without needing to cross-reference filenames. It also means your wiki stays useful even if you reorganize your raw files later.
Batch Ingests Need a Different Workflow
Processing one source at a time is straightforward — Claude reads it, you discuss the takeaways, and it writes the pages. But when you drop five or ten sources at once (which you will, once you get into a rhythm with the web clipper), that one-at-a-time approach becomes tedious.
Add a batch workflow to your CLAUDE.md: when multiple new sources are detected, Claude should present a summary table showing each source and what wiki pages it proposes to create or update. You review the plan, confirm, and Claude processes everything in one pass. This saves a lot of back-and-forth.
Unicode Will Break Things (And How to Fix It)
This is a small thing that will waste 20 minutes of your life if you don’t know about it. Some source filenames contain curly apostrophes, em dashes, or other Unicode characters — especially web-clipped articles. Claude Code’s file reading tool can choke on these.
The fix is simple: add a note to your CLAUDE.md telling Claude to use bash glob patterns as a workaround. Something like cat "/path/"*"keyword"* instead of trying to read the exact filename. I lost time debugging this before adding it to my schema, and haven’t had the problem since.
The Wiki Becomes Your Project’s Brain
The most surprising thing hasn’t been technical — it’s how the wiki changes the way I think about projects. When I started a second wiki for a side project idea, my first instinct was to do market research and competitive analysis. Instead of that work living in a Google Doc I’d never open again, it went straight into wiki pages. When I came back to the project days later, I just told Claude to consult the wiki, and everything was there — synthesized, linked, and ready to build on.
That’s the compounding effect Karpathy talks about, and it’s real. The wiki isn’t just storing information; it’s making connections I wouldn’t have made manually and preserving context across sessions that would otherwise evaporate.
If you set up a wiki from the tutorial above and haven’t touched it in a while, go back and feed it a few more sources. The magic isn’t in the setup — it’s in the accumulation.