Creating a coloring book used to require illustration skills, expensive software, and a lot of trial and error. In 2025, AI makes this process far more accessible — even if you’ve never designed a product before.
This guide walks you through exactly how to create a children’s coloring book using AI, from idea to a published Amazon KDP product. It’s written for beginners who want to learn by doing, explore modern AI tools, and create a real, tangible digital product.
You’ll learn:
- How to brainstorm and plan a full coloring book with AI
- How to generate clean, printable coloring pages using image models
- Which AI tools allow commercial use (and what that actually means)
- How to fix, upscale, and format images for print
- How to assemble and publish a coloring book on Amazon KDP
This is not a get‑rich‑quick guide. The coloring book market is crowded. The real value here is learning the process, building confidence with AI tools, and finishing something you can hold in your hands.
Jump to a Step
- The 9‑Step Process
- Step 1: Brainstorming Coloring Book Ideas with AI
- Step 2: Writing Image Generation Prompts (Very Important)
- Step 3: Generating the Images with AI
- Commercial Use & Copyright (Beginner Explanation)
- Step 4: Cleaning Up Images (AI + Manual Fixes)
- Step 5: Upscaling Images for Print Quality
- Step 6: Assembling the Book in Canva
- Step 7: Exporting the Interior PDF
- Step 8: Publishing on Amazon KDP
- Step 9: Order a Proof Copy (Highly Recommended)
- Costs, Time, and Expectations
- Who This Guide Is For
- Final Thoughts
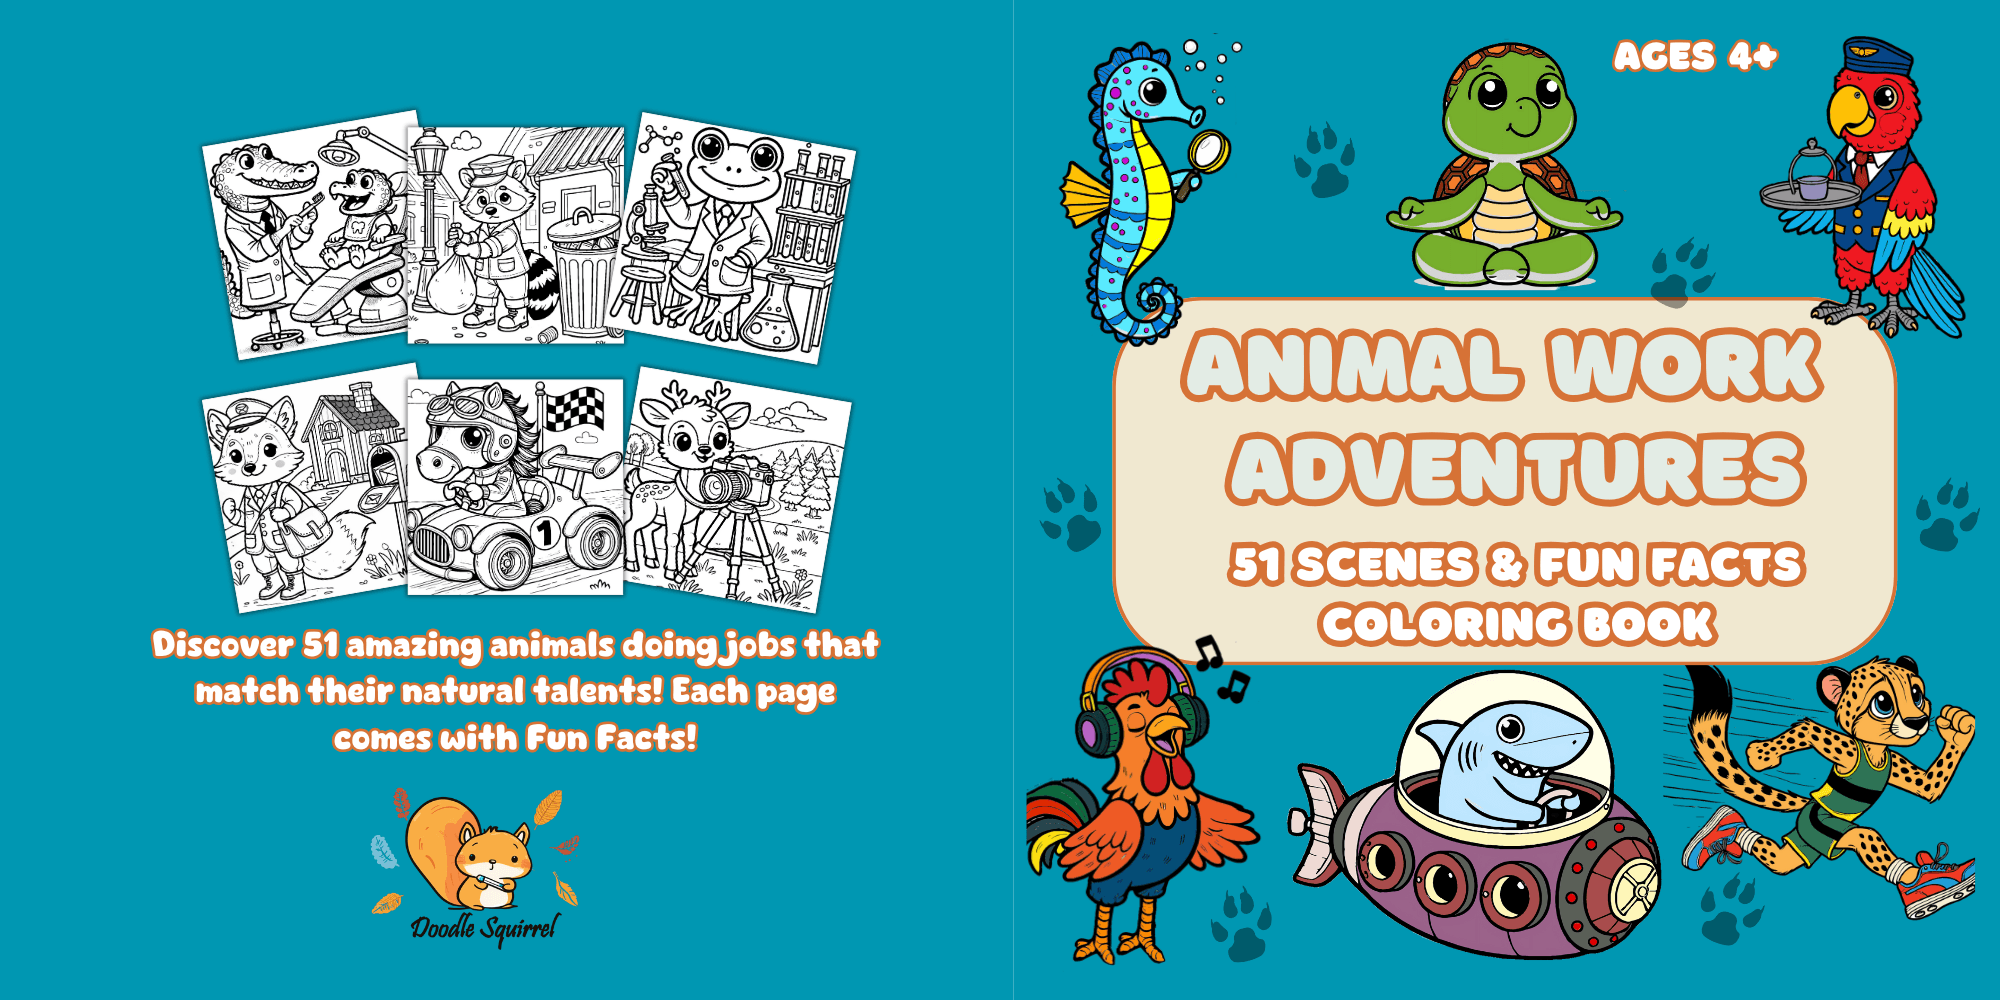
Real example: This guide is based on the exact workflow I used to create and publish Animal Work Adventures, a 51‑page children’s coloring book.
The 9‑Step Process: From Idea to Published Book
Step 1: Brainstorming Coloring Book Ideas with AI
Start by treating AI as a creative brainstorming partner, not the final decision‑maker.
I gave ChatGPT a few examples of my core idea (animals doing jobs related to their natural traits) and asked it to generate 50 concepts. From there, I selected, edited, and refined the ideas that actually worked.
Beginner tip:
- AI is excellent at generating quantity
- You provide judgment and taste
Once you select your ideas, number them (for example, 1–51). This makes it much easier to reference specific pages throughout the project.
Step 2: Writing Image Generation Prompts (Very Important)
Each coloring page needs a clear, structured prompt so the AI produces usable line art.
Here is a beginner‑friendly prompt template you can reuse:
Create a simple, clean black and white line drawing suitable for a [THEME]-themed coloring book of a [SUBJECT].

STYLE REQUIREMENTS:
- Bold, continuous black outlines on a white background
- No shading, gradients, or gray tones
- Clean, open spaces for coloring
- Moderate detail (recognizable but not overwhelming)
- Consistent medium‑thick line weight
- Flat 2D style (no 3D perspective)
- No text elements
- Subject fills at least 70% of the frame

SPECIFIC INSTRUCTIONS FOR [SUBJECT]:
- Pose and positioning
- Key features to include
- Expression or mood
- Simple background elements or props

DO NOT INCLUDE:
- Any color
- Shading or hatching
- Photorealistic textures
- Tiny intricate patterns
- Broken or sketchy lines
- Watermarks or signatures

The final image should look professionally designed for a children’s coloring book.
Beginner workflow:
- Take one idea from your list
- Paste it into the template
- Ask AI to customize the subject‑specific instructions
- Save each final prompt (I used OneNote, but any notes app works)
Step 3: Generating the Images with AI
You can use several image generation tools for coloring pages. I tested multiple options and found Google Gemini to be especially good at following detailed instructions and producing clean line art. When I made my book, I used Chat GPT and DALL-E, but if I were doing it today I’d use Gemini.
If you want to explore how Gemini’s image models (including Nano Banana and Nano Banana Pro) work and when to use them, check out my full Nano Banana image guide. This can help you understand what each model does and how to get the best results with Gemini’s tools.
For each concept:
- Generate 2–3 versions
- Choose the best result
- Slightly tweak the prompt if needed
This is normal iteration — don’t expect perfect results on the first try.
Commercial Use & Copyright (Beginner Explanation)
Before selling AI‑generated images, you must understand usage rights.
Important basics:
- Most major AI tools allow commercial use
- AI‑generated images alone are not copyrightable in the U.S.
- Adding meaningful human edits strengthens your claim
Quick overview:
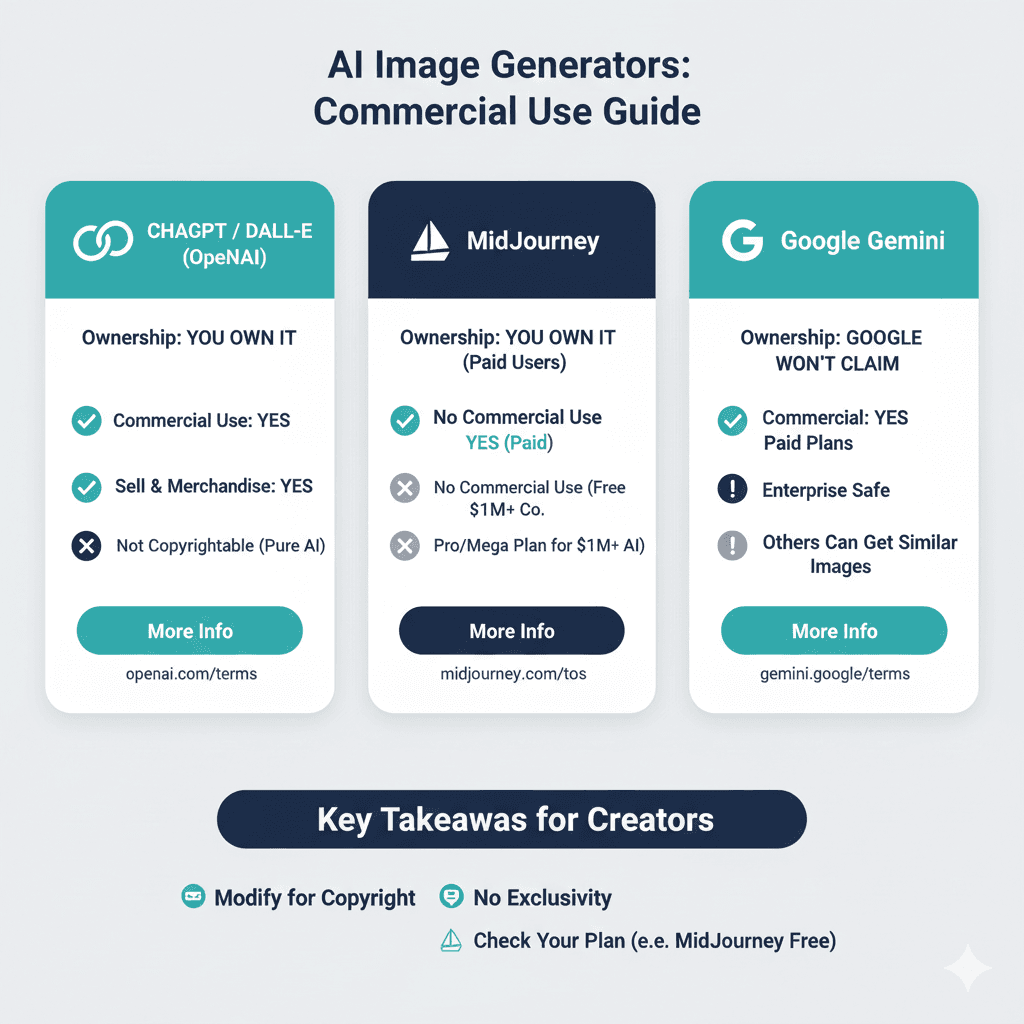
- DALL·E: You own and can sell the images
- MidJourney: Paid plans allow commercial use (large companies need Pro)
- Google Gemini: You can use outputs commercially; Google does not claim ownership
Because of this, editing images yourself is strongly recommended.
Step 4: Cleaning Up Images (AI + Manual Fixes)
AI images almost always need cleanup:
- Inconsistent line thickness
- Small anatomy errors
- Busy or distracting backgrounds
The fastest solution is to use AI for AI cleanup.
I created a custom instruction set in Gemini (called a “Gem”) that automatically refines coloring pages when an image is uploaded.
Beginner‑friendly cleanup instructions:
You are a coloring book line editor.

Rules:
- Preserve character, pose, and composition
- Fix anatomy and close broken lines
- Remove textures and busy backgrounds
- Use black ink on pure white only
- Bold, uniform, fully closed lines
- Target age: 4+

Generate the refined image immediately.
For stubborn issues, free tools like GIMP work well for manual touch‑ups.
Step 5: Upscaling Images for Print Quality
Most AI images are generated at 1024×1024 pixels, which is not enough for print.
For a standard 8.5 × 8.5 inch coloring book, you need about 300 DPI, or roughly 2500×2500 pixels minimum.
I used bigjpg.com with these settings:
- Image type: Artwork
- Upscaling: 4×
- Noise reduction: None
Cost: ~$6
Result: High‑resolution PNG files suitable for printing.
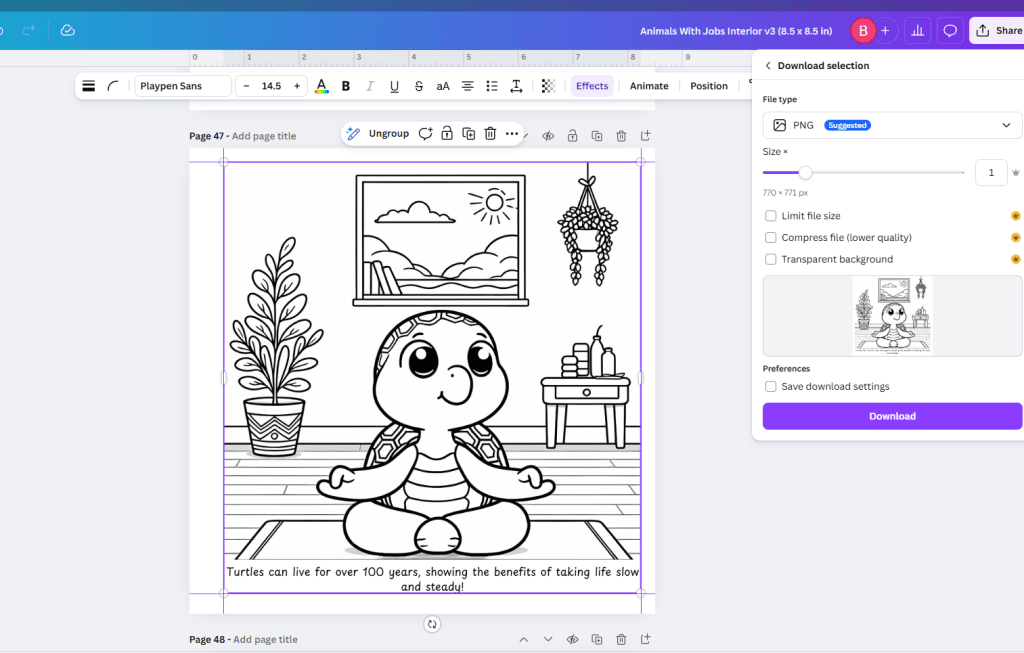
Step 6: Assembling the Book in Canva
Canva is beginner‑friendly and works well for KDP interiors.
Recommended setup:
- Page size: 8.5″ × 8.5″
- No bleed (simpler for beginners)
- Margins:
- Binding side: 0.625″
- Other sides: 0.25″
Layout tips:
- Place coloring pages on right‑hand pages only
- Add blank pages on the left to prevent marker bleed
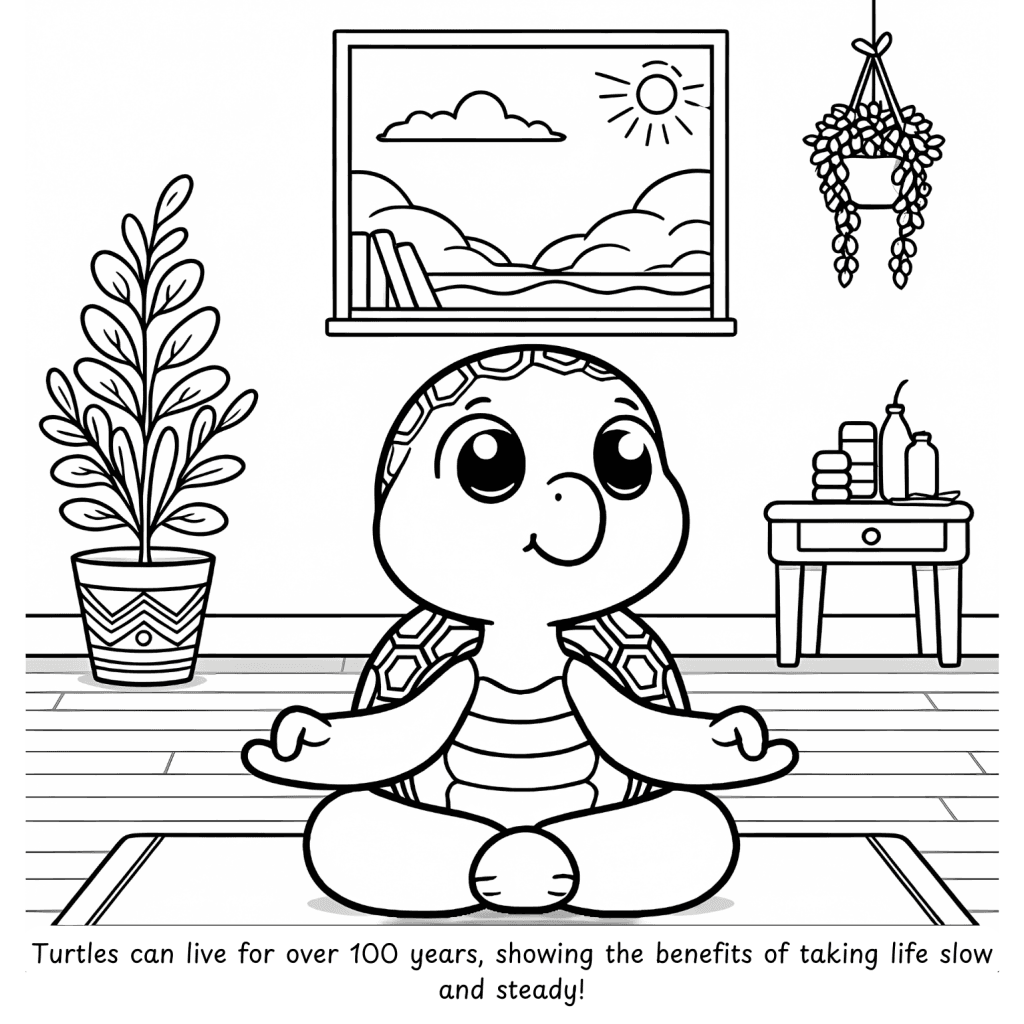
- Optional: Add one fun fact per page for engagement
Step 7: Exporting the Interior PDF
In Canva:
- File type: PDF Print
- Flatten PDF: On (if available)
- Crop marks & bleed: Off
Upload the PDF to Amazon KDP and preview carefully.
Step 8: Publishing on Amazon KDP
Upload your interior and cover separately. Amazon’s preview tool will flag margin issues immediately.
Review every page carefully.
Approval typically takes 48–72 hours.
Step 9: Order a Proof Copy (Highly Recommended)
A proof copy costs about $3 and is worth it.
You can:
- Check binding comfort
- Spot layout mistakes
- See your work in physical form
Holding the book feels very different than viewing a PDF.
Costs, Time, and Expectations
Total cost: ~$10
Profit per book: ~$1.66 (at $8.99 list price)
Time investment:
- First time: 6–8 weeks (learning everything)
- Now: ~2–3 days for a similar project
This is a learning project first — not passive income.
Who This Guide Is For
This process is ideal if you are:
- New to AI tools
- Curious about digital products
- Comfortable learning by trial and error
- Interested in publishing on Amazon KDP
It’s not ideal if you expect quick profits or zero effort.
Final Thoughts
This project started as a simple idea and ended as a real, physical book. The tools are better than ever, the costs are low, and the learning experience is valuable.
If you want to learn AI by building something tangible, a coloring book is a surprisingly good place to start.
Happy creating 🐿️